
4D v13
Printing graphs
 Printing graphs
You can print a graph in the following ways:
- As a single 4D Chart document,
- As part of a 4D form,
- As a part of a print merge, in which you print a 4D Chart document for each record in a selection of records.
The order in which a multi-page document is printed (either horizontally or vertically) is determined by the print order selected in the Properties dialog box. You can select printing by row, or printing by column. The print order affects only the order in which the document prints; it does not affect the page orientation. The default is to print pages by row.
To set the order in which a multi-page document is printed:
- Choose Properties from the 4D Chart Edit menu.
The Properties dialog box appears.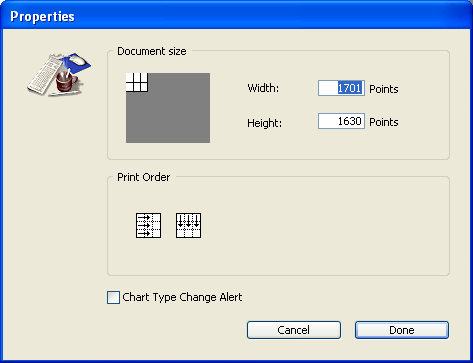
- Click the desired Print Order icon and click OK.
You can print 4D Chart documents from a plug-in window or from a 4D Chart area in a form. If the document is more than one page in length, you can select the pages you want to print.
To print a separate 4D Chart document, you choose Print from the 4D Chart File menu. The standard Print dialog box appears. Select options as necessary and click the Print button to begin printing.
If a 4D Chart area is on a 4D form, you can print it with the record. In this case, you print from 4D, rather than from 4D Chart.
Before printing, be sure to select the records you want to print. For more information about selecting records in 4D, see Displaying and selecting records.
To print a 4D Chart document as part of a record, choose Print from the 4D File menu. A dialog box appears so that you can choose the form containing the 4D Chart area to print.
Once you have validated the print setup dialog boxes, the selected records are printed, including the 4D Chart documents.
You can perform a print merge of a 4D Chart document. Performing a print merge allows you to print a 4D Chart document for each record in a selection of records.
Warning: The values in any graphs in the document are not updated for each record.
Print merges are most useful when performed from 4D Chart plug-in windows.
You can only perform print merges for documents that contain references to 4D fields. The value in a field reference is determined by the current record being printed. The advantage to performing a print merge is that you can print a document for an entire selection of records without having to load and print for each record separately.
To perform a print merge:
- Choose Print Merge from the 4D Chart File menu.
Note: This command is only available when at least one field of the database has been inserted into the 4D Chart document.
The Create Merge Selection dialog box appears.
- Choose the table whose records should be included in the print merge.
The dialog box displays the number of records currently selected for that table. 4D Chart will only print the document for the selected records. - If you want to change the selection of records, click the Query button.
The 4D Query editor appears. - If you want the selected records to be sorted, click the Order by button.
The 4D Order by editor appears.
When you have selected the appropriate records, you can print them. - Click OK in the Create Merge Selection dialog box.
The Print dialog box appears. - Select the appropriate options and click OK.
4D Chart prints the document for each record in the selection.
Product: 4D
Theme: Using 4D Chart


