
4D v13
Arranging objects
 Arranging objects
When you have two or more objects in a 4D Chart document, you can use the items in the Arrange submenu of the Object menu to arrange them.
When you draw objects, they can partially or entirely overlap one another. The order in which objects are placed when they overlap one another is called the stacking order. As you work with objects, you may want to change the stacking order of objects; to do so, you can move one or more objects in front of or behind other objects using the Object>Arrange submenu commands:
- Bring to Front: By moving an object in front of all others, you move it to the top layer.
- Send to Back: By moving an object behind all other objects, you move it to the bottom layer.
- Move Foreward: Moving an object in front of another object allows you to move the selected object one layer higher — that is, place it closer to the top layer.
- Move Backward: Moving an object behind another object allows you to move the selected object one layer lower — that is, place it closer to the bottom layer.
When you align objects, you position them in relation to each other. Aligning objects ensures that they are placed precisely in relation to each other. You can align objects both horizontally and vertically.
The object that is farthest in the selected alignment direction is the reference for object alignment. For example, if you want to align the left sides of several selected objects, the selected object that is furthest to the left remains fixed, and the other objects are aligned with it.
When you select Align Objects from the Arrange submenu, the Align Objects dialog box appears:
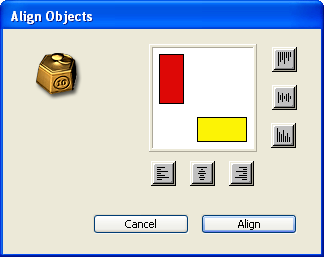
Use the icons in the dialog box to align the selected objects with each other.
Select a maximum of one vertical and one horizontal alignment. The model objects move to indicate the effects of the alignment.
Note: To deselect an icon, click it again.
By grouping objects, you can combine several objects into one. A grouped object acts like a single object when you manipulate or edit it. You can work with a grouped object as you would any other object; you can change its attributes, resize it, and so on.
When you group several objects, all attributes of the individual objects are retained. However, if you change any attribute of the group, that change affects all objects in the group. For example, if you select a new fill pattern for the group, it is applied to each object in the group.
Ungrouping an object breaks it into its component objects. When an object is ungrouped, each piece becomes a separate object again. Ungrouped objects retain any changes made to them while part of a group.
To group/ungroup objects, choose Group or Ungroup from the Arrange submenu of the Object menu.
Product: 4D
Theme: Using 4D Chart


