
4D v13.4
Creating thumbnails
 Creating thumbnails
The Picture Library contains a set of functions that allow you to create and modify a row by column array of pictures for use in picture buttons or picture menus. The array may be either one- or two-dimensional. In the Picture Library, such an array is called “Frames.” Elsewhere in 4D, an array of pictures may be called “thumbnails” or a “table” of pictures. The idea consists of splitting a picture using rows and columns; each cell is therefore considered a “frame” or “thumbnail.” 4D takes care of displaying the correct frame in the picture button or picture menu according to the specified parameters (for more information refer to Picture Buttons and Picture Pop-up Menus).
You can set a sequence of frames when creating a picture or even afterwards. You can also insert or delete lines, columns, or frames in an already defined sequence of frames.
You can create a sequence of frames from a picture already placed in the Picture Library or when you add a picture to the Picture Library. In both cases, you set how the picture is to be divided into separate frames in the Picture properties dialog box. If you are creating a picture, the dialog box appears automatically. Otherwise, double-click on the picture or select it and choose Picture Properties from the options menu of the library.
The Frame area allows you to set the number of lines and columns of your frame sequence. To create frames, you must first check the Split Picture option:
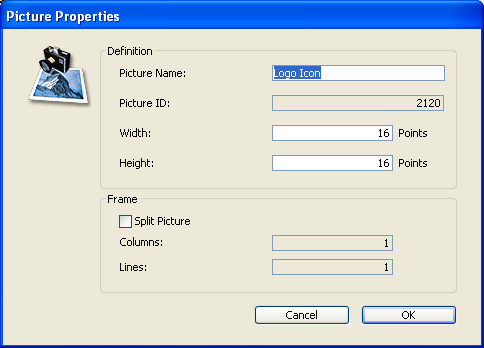
The size of the frames is automatically calculated by 4D. When you set a sequence of frames, the “Width” and “Height” areas are modified and the size of each frame is displayed.
If you want to modify the size of the frame later, you just have to enter new values into the Width and Height areas without worrying about the global size of the picture. Each resulting frame will be centered automatically (without the picture being distorted) in the new size if it is bigger. If the new size is smaller, each frame will be truncated.
You can preview each frame to check the sequence’s appearance by using specific tools in the Picture Library’s toolbar:

Activate the Splitting mode / Navigation arrows to move between frames/ Test animation
When you activate the splitting mode, 4D splits the picture and displays the first frame (located in the upper left corner). You can then navigate through the frames using the arrow buttons.


You can also display all the frames automatically. This function is particularly useful if you want to create picture buttons that display in a continuous sequence. To do so, click on the Test Animation button  . The frames appear in a continuous manner. To stop the test, click the button once again.
The Picture Library allows you to insert and delete frames in a previously created sequence of frames. You can insert frames as well as columns and lines.
Important: Inserting or deleting frames modifies the original picture. As in the case of manual modification (see Modifying picture contents), if the original picture includes specific characteristics (vector graphic, alpha channel, and so on), they will be lost when the final sequence of frames is saved.
To insert frames:
- Select the frame sequence to modify.
- Click on the insertion button
 in the toolbar of the library.
The following dialog box appears: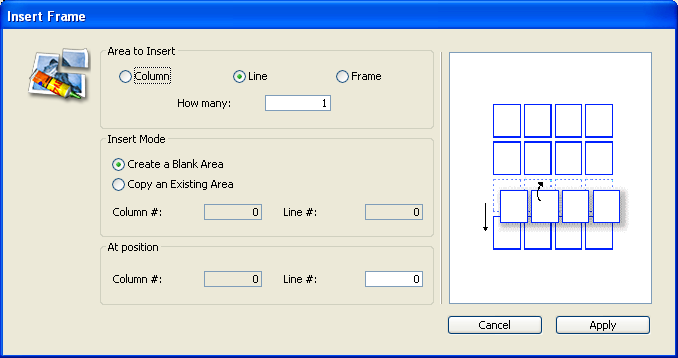
- Indicate whether you want to insert a column, line, or frame, and indicate how many in the upper portion of the dialog box.
The preview area on the right side of the dialog box shows you an example of the selected operation. Note that inserting an element moves the others (no element is replaced). - In the “Insert Mode” area, indicate whether you want the inserted element to be blank or whether it should contain the contents of an existing element.
In the latter case, you must designate the element to recopy.
Note: The number of the first column and first line is 0. - Indicate the location in which you want the new element to be inserted and click Apply.
The element is then inserted in the picture.
To delete frames:
- Select the frame sequence to modify.
- Click on the deletion button
 in the toolbar of the library.
The following dialog box appears: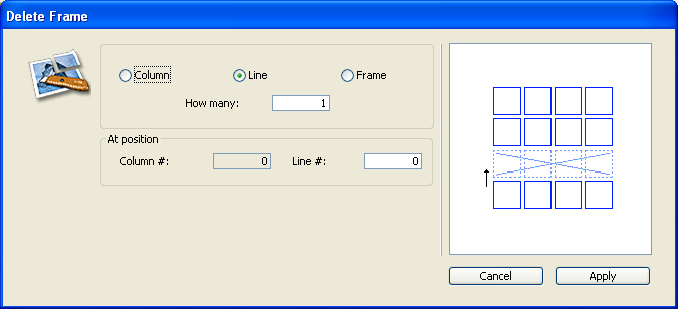
- Define the element (column, line, or frame) that you want to delete and indicate how many.
The preview area on the right of the dialog box shows you an example of the selected operation. - Indicate the position where you want the element to be deleted and validate the dialog box..
Note: The number of the first column and first line is 0.
Product: 4D
Theme: Picture library


